Install and deploy Ichicraft Boards from Microsoft AppSource

Installing Ichicraft Boards is easy, just follow the steps and you’ll be up and running in no time. First follow the general installation steps (part 1), then follow the steps to install in SharePoint Online (part 2). If you want to offer Ichicraft Boards as a personal app in Microsoft Teams, you must also follow the steps in (part 3).

Part 1: Install

  1. Browse to the tenant-wide App Catalog OR Site Collection App Catalog

    You must have set up and configured the tenant-wide App Catalog OR a Site Collection App Catalog in your Microsoft 365 tenant. Please see Set up your Office 365 tenant and follow the Create app catalog site section OR if you want a scoped deployment to a Site Collection App Catalog see Create a Site Collection App Catalog and follow Create a site collection app catalog.

    If your tenant-wide or Site Collection App Catalog has already been provisioned you will need (access to) an account that has permissions to upload a package to complete the installation process.

    If you do not know how to locate the App Catalog, try browsing to the following link (replace {your-tenant-name} with your tenant name from your SharePoint url):

    Tenant-wide App Catalog:
    https://{your-tenant-name}-admin.sharepoint.com/_layouts/15/online/ManageAppCatalog.aspx

    Site Collection App Catalog:
    https://{your-tenant-name}/{your-site-collection-name}/AppCatalog

  2. Click on the gear icon in the top right corner and select Add an app.

  3. Open the SharePoint Store from the top navigation.

  4. Type “Ichicraft” in the search box to find the Ichicraft Boards App and click on the app.

  5. Click on  “Add to app catalog” button

  6. A dialog will be presented with more details about app permissions and data access, click on “Add”.

  7. A following dialog is presented to help you find the API access page, click on “Go to API access page” to review the API permissions needed to use Ichicraft Boards.

  8. On the API access page approve the Ichicraft Boards related permissions as shown (User.ReadWrite.All and Directory.Read.All) in the picture.

  9. Continue with steps in Part 2 (Add Ichicraft to your modern SharePoint intranet)

Part 2: Add Ichicraft Boards to your modern SharePoint intranet

To install and configure the web part and site collection you will need to complete the following steps:

  1. Provision/Identify Modern Communication Site

    Either identify an existing SharePoint communication site or provision a new one in your SharePoint Online tenant. For more information about how to provision a communication site see Create a communication site in SharePoint Online and follow the instructions.

  2. Activate Ichicraft Boards App

    a. On the site where you want to add Ichicraft Boards, push the Office 365 Settings button on the navigation bar at the top of the screen and then click Add an app.
    b. On the Your Apps page you should see something like this:


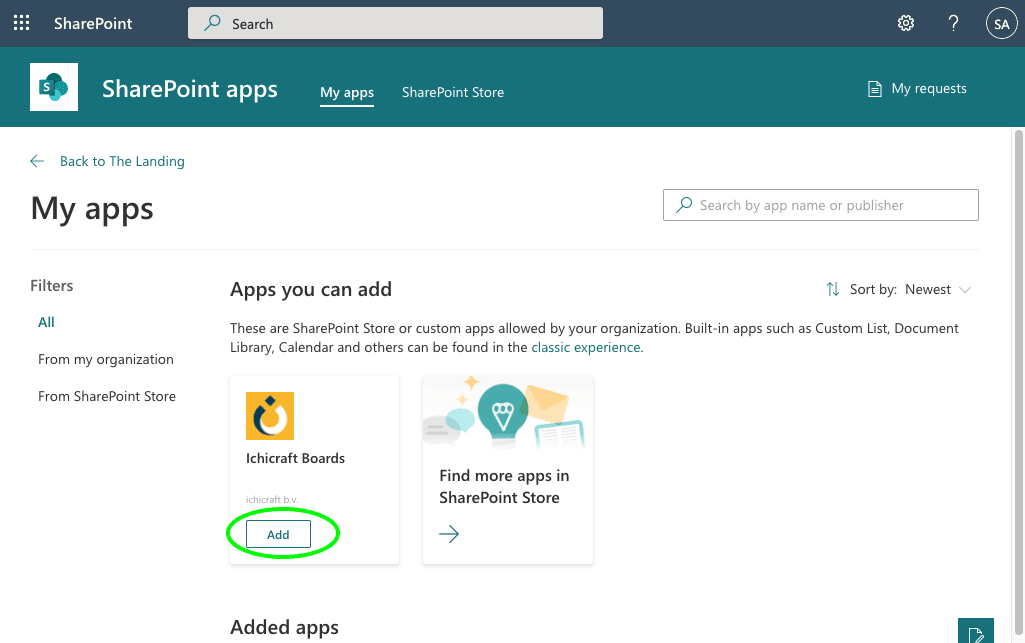
    c. Click on “Add” to activate the app in your site,  making the Ichicraft Boards web part available

  3. Add Ichicraft Boards web part to the page and start configuration

    a. Navigate to the respective modern page where you would like to add the Ichicraft Boards web part and click on + sign. You should see something like this:
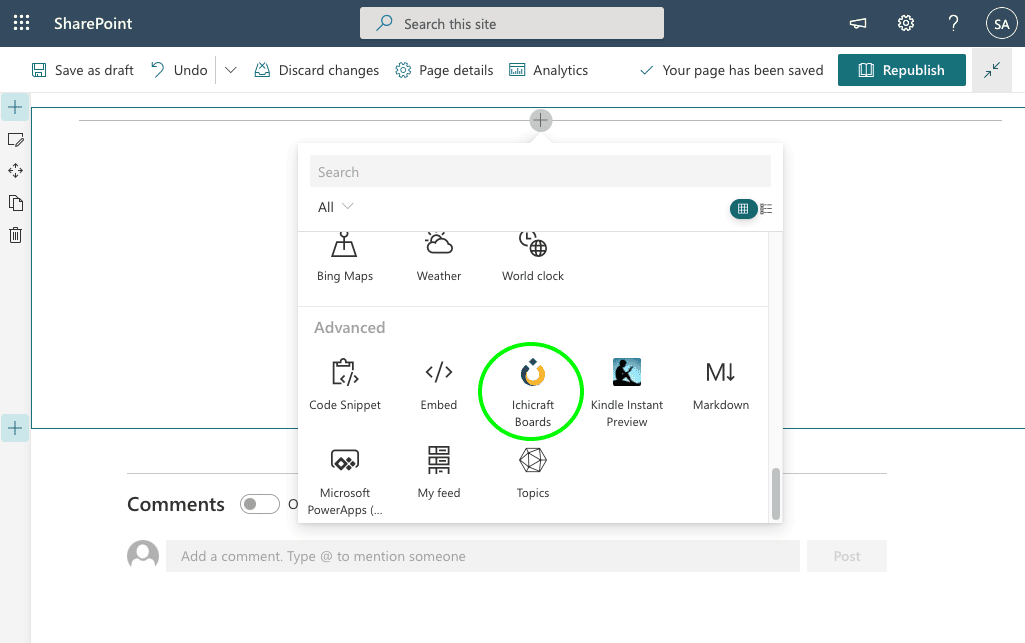
    b. Click on “Ichicraft Boards” to add it to the page
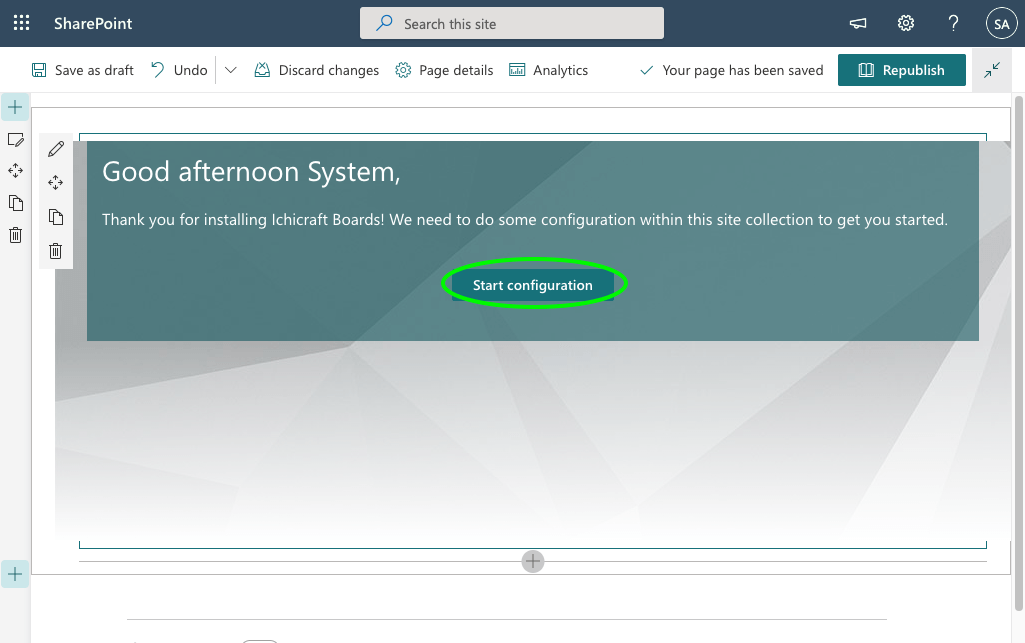
    c. Save or Publish the page
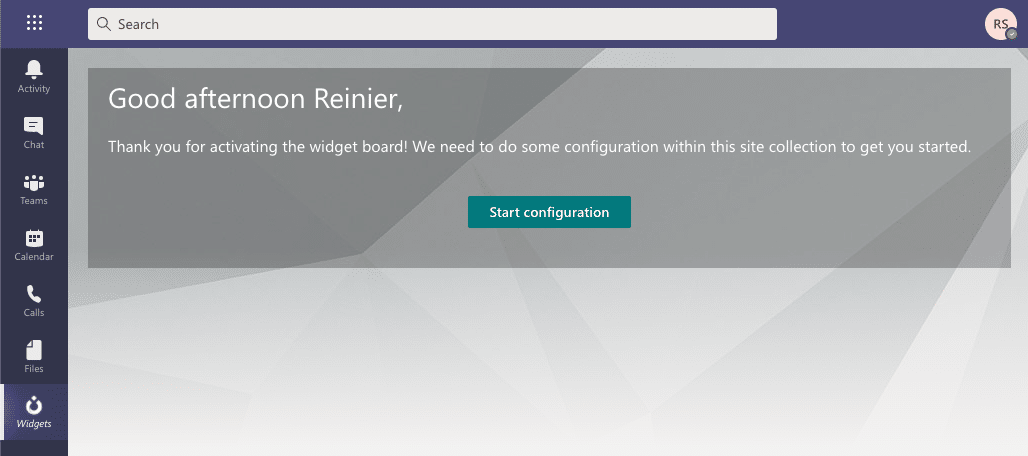
    d. Start the Widget Board configuration by clicking on Start configuration.

  4. You have successfully installed Ichicraft Boards

  5. If you want to offer Ichicraft Boards as a personal app in Teams continue with steps in Part 3 (Teams).

Step 3 (optional): Add Ichicraft Boards to your Teams client

To install and configure Ichicraft Boards for your Teams client you will need to complete the following steps:

  1. Generate a Teams package from the Widget Board Administration

    a. Go to the site collection where you have installed Ichicraft Boards in Step 2.
    b. Open the Widget Board Administration and select Teams from the left navigation,  you should see something like this:

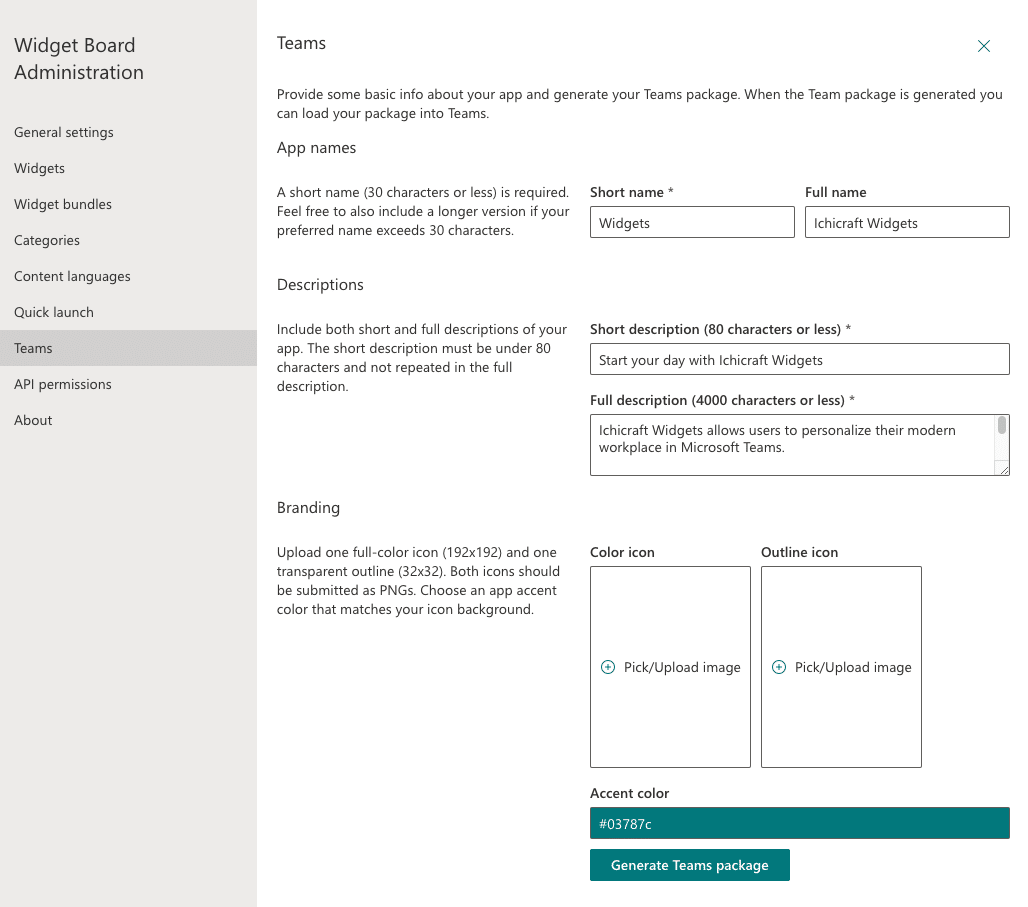
    c. Update the configuration if needed and click on Generate Teams package

  2. Go to the Microsoft Teams tenant app catalog and add the Teams package

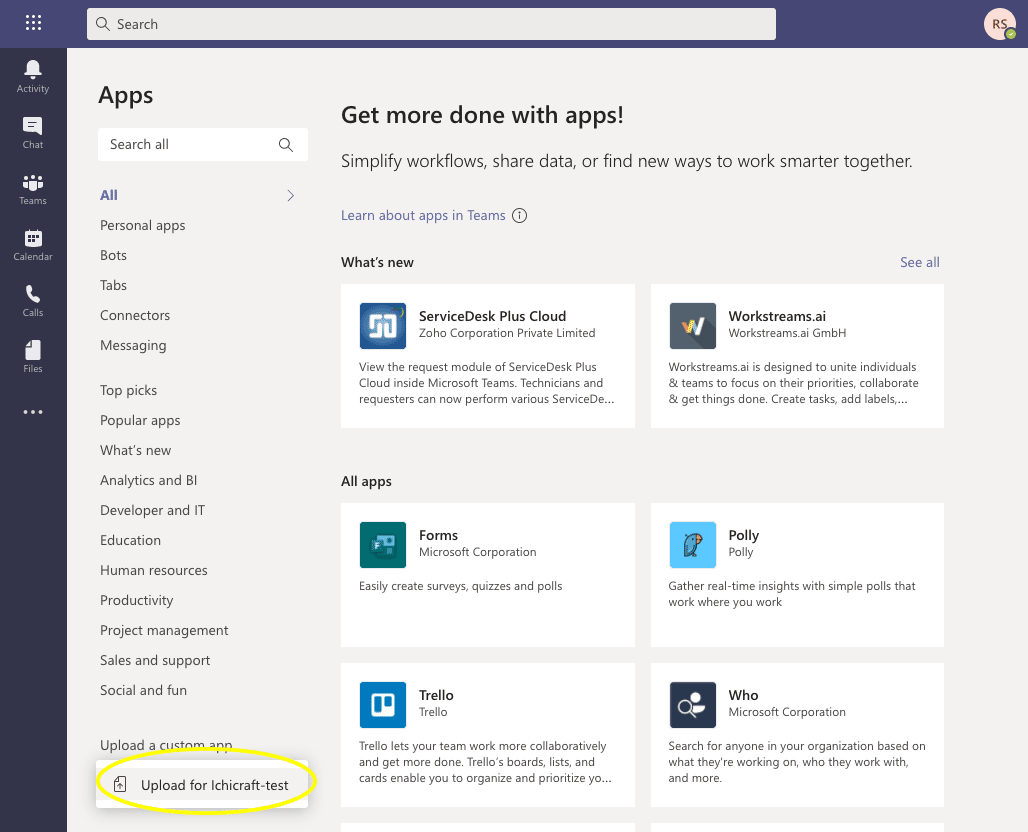
    a. Start Teams and sign in using your global or teams service admin credentials. Select Apps on the (bottom) left side of the app.
    b. On the Apps page, select Upload a custom app > Upload for [your tenant name]. You should see something like this:

  3. When you go back to your tenant app catalog, Ichicraft Boards is available to add to your Teams client. Click on the deployed app.

  4. To add the Teams App click on Add, you should see something like this:

  5. You have successfully installed the Ichicraft Boards Teams package! You can start the configuration wizard.

Questions?

We are happy to help! Feel free to get in touch with us.

Understanding the Differences

Personal Boards: A Unique Workspace For Every Individual

Our Personal Boards feature provides a unique solution for those seeking a bespoke virtual workspace. Personal Boards offer seamless integration of various applications from Microsoft 365 and beyond into a single, unified workspace. Whether it’s your calendar, tasks, files, or Power BI reports to track important metrics—everything can be consolidated on your Personal Board.

As a user, you’re granted considerable control over your Personal Board. You can add, resize, move, and delete widgets according to your work style and needs. You can also edit the personal settings of widgets, create additional Personal Boards, and delete any Personal Board (unless it’s the Home board).

For administrators, Personal Boards offer unique tools to manage the balance between personalization and organization-wide consistency. Admins can limit the personalization options of some widgets that are provided through a Personal Board template. This includes the ability to lock a widget in place, prevent its resizing, or stop its deletion from the personal board. This is particularly useful when offering a personal board as a landing page for the entire organization, allowing users to personalize their digital workspace while ensuring critical information, such as corporate news, remains consistently visible to everyone.

Shared Boards: Designed As Shared Dashboards

Shared Boards emphasize communal collaboration and consistent information sharing. They are designed as shared dashboards, where resources, tools, and updates can be accessible to all relevant users. For example, imagine a News Hub shared board that aggregates and displays news from both inside and outside the organization; it can serve as a central point for keeping everyone up-to-date with the latest updates and developments.

Let’s take another practical scenario. A HR manager wants to share some HR-related reports with his team. With Shared Boards, he can easily create a ‘HR Reports’ board, add relevant widgets such as Power BI reports, or even real-time data widgets connected to the HR system, and share this board with his team. This can significantly streamline the process of report sharing, making sure everyone on the team can access and review the necessary information in a centralized, easily accessible location.

Creating a new shared board can be a seamless process, with companies having the option to provide a template. This ensures consistency in structure, streamlining the setup process for new projects, teams, or even entire departments. What’s more, admins have the power to push a shared board to automatically appear in the navigation, making it readily accessible for users.

One of the main strengths of Shared Boards lies in the level of control they offer to administrators. Defining who can create shared boards allows for a structured and organized approach, ensuring the right balance between creativity and consistency. Moreover, admins can conveniently access and manage these boards across the entire organization from the admin settings of Ichicraft Boards.

In terms of permissions, a Shared Board Visitor can view the board, interact with the content in widgets, and add or remove a Shared Board from their navigation (provided these actions are allowed and it’s not the Home Board). On the other hand, a Shared Board Owner has all the privileges of a visitor, along with additional capabilities. They can add, resize, move, delete widgets, edit shared settings of widgets, manage board access, edit board details, delete shared boards, and publish a shared board. The control of layout and design rests solely with the Shared Board Owners, ensuring the board’s integrity while still allowing collaborative interaction.

Distinguishing Differences: Personal Boards vs Shared Boards

While both Personal Boards and Shared Boards offer unique advantages, understanding their specific differences is crucial for maximizing their potential.

Personal Boards are primarily individual-centric, allowing each user to customize a workspace tailored to their unique needs and preferences. They can integrate applications, manage tasks, and monitor key metrics that are most relevant to them. Personal Boards are centered on fostering a productive, personalized workspace. However, this individual focus does not limit their potential for promoting organization-wide engagement. Administrators can influence Personal Boards by limiting the personalization options for certain widgets. For instance, a company might choose to always have a corporate news widget on each personal board, ensuring essential updates reach every individual. This feature creates a unique blend of personalized experience and consistent corporate communication within the Personal Boards.

In contrast, Shared Boards emphasize communal collaboration and consistent information sharing. They are designed as shared dashboards, where resources, tools, and updates can be accessible to all relevant users. This communal nature makes them ideal not just for team-level collaboration, but also for larger units like departments or even the entire organization. For example, a News Hub Shared Board can serve as a comprehensive information center, capturing all news from within and outside the organization, ensuring everyone has access to the latest updates and developments.

When it comes to control, both types of boards provide users with the ability to add, resize, move, and delete widgets. However, Personal Boards offer more scope for individual customization, including the ability to edit the personal settings of widgets and create additional Personal Boards. Meanwhile, Shared Boards provide extensive administrative control options, allowing admins to define access rights, manage shared settings of widgets, and more.

In essence, while both Shared and Personal Boards enhance productivity and connectivity, they do so in unique ways. Shared Boards aim to unify information and resources, encouraging seamless collaboration on a broader scale. In contrast, Personal Boards provide a more intimate, personalized workspace, that can also host key organization-wide content, creating a perfect blend of individual work style and corporate consistency.

Comparative Overview: Personal Boards vs Shared Boards

To provide a clearer understanding of how Personal Boards and Shared Boards differ across functionalities and roles, we have compiled a comparative table. This overview will help you understand the unique capabilities and overlapping features of both types of boards across the roles of a user, visitor, owner, and admin/organization. This comprehensive comparison will allow you to navigate the features of Ichicraft Boards efficiently, enhancing both individual productivity and organizational collaboration.

Here’s the breakdown of functionalities for each role in both Personal and Shared Boards

Role/Features

Personal Boards

Shared Boards

User

Add/resize/move/delete widgets

Yes

No

Interact with widgets

Yes

Yes

Edit personal/shared settings of widgets

Yes

No

Delete a Board (Not the Home board)

Yes

No

Create additional Boards

Yes

No

Visitor

View Board

N/A

Yes

Interact with widgets

N/A

Yes

Add/remove a Shared Board to/from navigation

N/A

Yes (If allowed)

Owner

Add/resize/move/delete widgets

N/A

Yes

Interact with widgets

N/A

Yes

Edit shared settings of widgets

N/A

Yes

Edit Board access

N/A

Yes

Edit Board details

N/A

Yes

Delete Shared board

N/A

Yes

Publish a Shared board

N/A

Yes

Push a shared board to navigation

Yes (If allowed)

Admin/Organization

Install widgets from the Ichicraft catalog

Yes

Yes

Install custom-developed widgets

Yes

Yes

Create Personal Board templates

Yes

N/A

Create Shared Board templates

N/A

Yes

Change the overall look and feel

Yes

Yes

Configure what content is displayed in each widget

Yes

Yes

Configure the multilingual languages used

Yes

Yes

Analyse the usage

Yes

Yes

Define who can create boards

No

Yes

Limit personalization (push, lock, move, resize) options of widgets

Yes

No

Push a shared board to navigation

No

Yes

Configure categories to group widgets

Yes

Yes

This table illustrates the flexibility and depth of customization offered by Ichicraft Boards. Whether it’s the personalization for individual users or the collaborative spaces for teams, departments, or the whole organization, Ichicraft Boards cater to the dynamic needs of a modern digital workplace.